

Unity is one of the most powerful and beginner-friendly game engines available today, and deciding to learn Unity is never a bad idea! In this guide, I’ll walk you through the process of creating your first game in Unity, step by step, and by the end, you’ll have a simple, playable project—no prior experience needed!
Let’s break down the process of installing Unity, understanding the editor, and making your very first game!
Step 1: Downloading & Installing Unity
Before we start, you’ll need to install Unity. Follow these steps:
- Go to the Unity Download Page and download Unity Hub.
- Install Unity Hub by following the instruction onscreen, and open it.
- Once opened, click Installs → Install Editor, and choose the latest LTS (Long-Term Support) version.
- Once installed, you’ll have a version of the Unity editor on your computer.
Step 2: Creating your first Unity Project
Once Unity is installed:
- In Unity Hub, click Projects → New Project.
- Choose 2D for now, but for later projects, here’s where you would select the type of game (2D/3D) you want to make.
- Give your project a name, select a save location, and click Create.
Step 3: Understanding the Unity Interface
When your project opens, you’ll see several key panels. These are the core of the editor, and are worth understanding when you’re starting with Unity, as you’ll use them all the time.
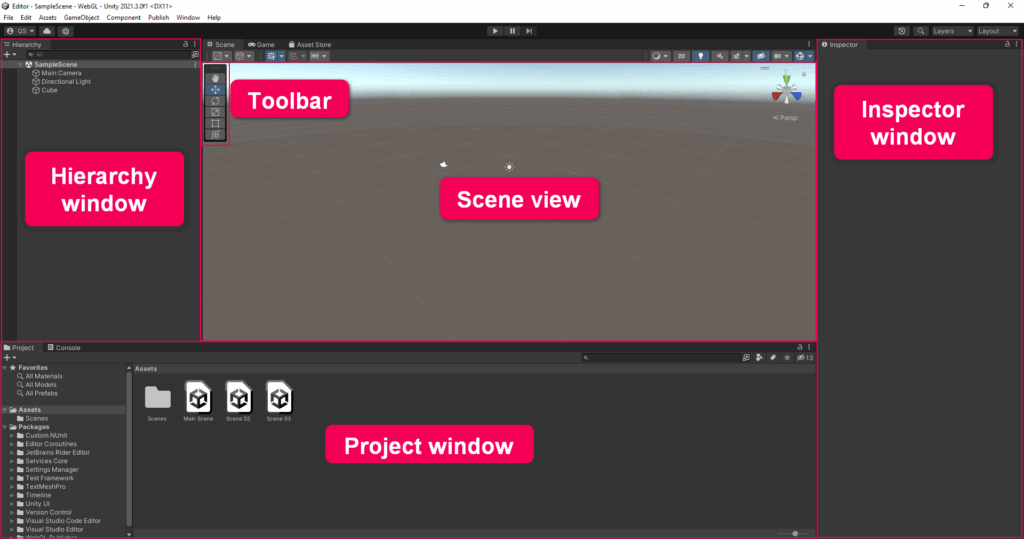
- Hierarchy (Left window): This is where you manage all of your game’s GameObjects (players, enemies, UI elements, etc…).
- Scene View (Central window – Tab 1): This is where you arrange and organize your scene’s (current level/screen) layout.
- Game View: (Central window – Tab 2): This simulates player will see. Your game can be showcased in real-time in this window by clicking the Play Button at the top of your screen.
- Inspector (Right window): This displays details about a selected GameObject, such as its position and attached scripts.
- Project Panel (Bottom window – Tab 1): This displays all of your game’s assets (scripts, sprites, etc.) as they’re stored on your PC.
Take a moment to click around and explore!

See our classes for detailed, step-by-step tutorials on building your own games in Unity! Learn the basics, create mobile games, and equip yourself with the skills to make any game you want!


Step 4: Adding a Player Object
Now, let’s add a basic player object:
- In the Hierarchy, right click and select 2D Object → Sprites → Square. This is your first GameObject, and will be your player.
- Rename the GameObject to “Player“.
- Click on the Player, then go to the Inspector panel.
- Click Add Component → Rigidbody2D for physics effects like gravity. Also add a BoxCollider2D.
- Finally, create another square sprite and stretch it into a rectangle. This will be our floor. Add a BoxCollider2D to this object too.
Step 5: Writing a Simple Script
Let’s add basic movement to our player! You might not be an expert coder when you’re starting with Unity, but even just by using the engine, you’ll learn C# as you go!
using UnityEngine;

public class PlayerMovement : MonoBehaviour
{
    public float speed = 5f;

    void Update()
    {
        float move = Input.GetAxis("Horizontal");
        transform.Translate(move * speed * Time.deltaTime, 0, 0);
    }
}- In the Project Panel, inside the Assets folder, right-click and select Create → MonoBehaviour Script.
- Name it “PlayerMovement“. For future scripts, make sure that the script name and class name always match (see below).
- Double-click to open it in Visual Studio (or your preferred code editor).
- Replace the default code with the code on the right:
- Save the script and attach it to the Player object by dragging it onto the player’s Inspector panel.
- Now press the Play Button (at the top center of your screen.) You should be able to move left and right with the arrow keys!
Browse our selection of prebuilt, ready-to-use game assets to accelerate your game development! Whether you’re looking for scripts, backgrounds or characters, check our asset store to find what you need!


Step 6: Adding a Jump Mechanic
Next, to add jumping to our movement, modify the script by switching the “Update” void to that shown on the right.
This makes the player jump when the space bar is pressed. You can test this out, as before, by pressing the play button. You’ve just finished building a basic character controller!
void Update()
{
    float move = Input.GetAxis("Horizontal");
    transform.Translate(move * speed * Time.deltaTime, 0, 0);

    if (Input.GetKeyDown(KeyCode.Space)) {
        GetComponent<Rigidbody2D>().AddForce(Vector3.up * 300);
    }
}
Step 7: Next Steps
Congratulations! You’ve just built your first ‘game’ in Unity! 🎉 While it might seem simple, getting a hold of the basics of the Unity engine gets you a lot closer to being able to create whatever game you want! Deciding to learn Unity and game development is never a bad idea, from learning how to code and having a marketable skill, to uncovering a new way to be creative.
Go back through all these steps and make sure you understand each one, then try and add something else to your game. For instance, see if you can use booleans, colliders and the OnCollisionEnter2D/Exit2D methods (which trigger when the player collides with the ground) to make it so your player can only jump when on the ground! This might be hard at first, but it’ll make your first game in Unity that more impressive!
Regardless, good job on completing this tutorial, and starting with Unity and game development! Good luck creating your projects, and if you have a great game idea, post it below in the comments!

Get 1 free month of Skillshare!
Use the link below to get access to one month of Skillshare!
Access all Tirion Learning classes, as well as thousands of others courses, digital products, live sessions and more!
I’m thinking of making a time-travel game where you fix paradoxes in different time periods. Super excited to start in Unity!
sounds cool, dude